-
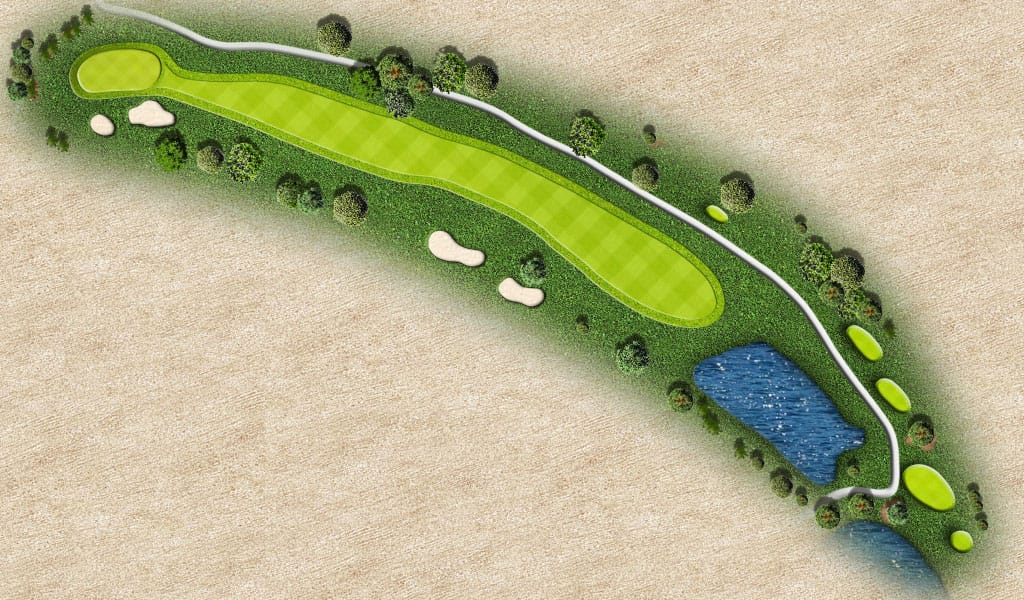
Hole #1
Par 4 | Jacaranda
A par 4 with a narrow approach to a large green. To play this hole well, a good drive in the middle of the fairway, staying away from the trees on the right side and the bunkers on the lefthand side. This large green has a false front, so a good shot to the middle is your best bet.
Tee & Yards I: 391II: 371III: 363IV: 337V: 330VI: 309VII: 242
Handicap: Men: 12, Ladies: 12
-
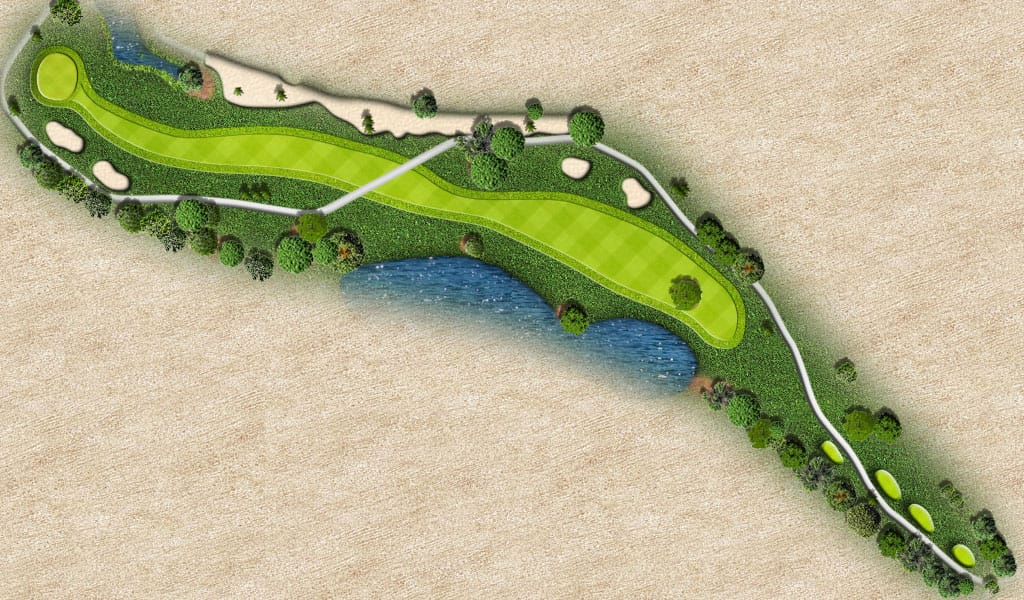
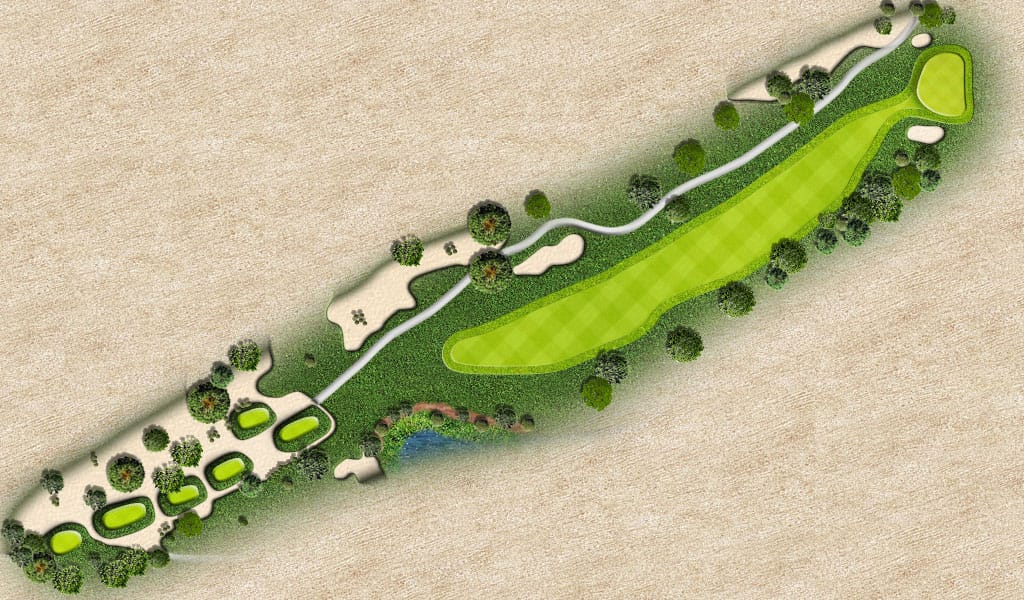
Hole #2
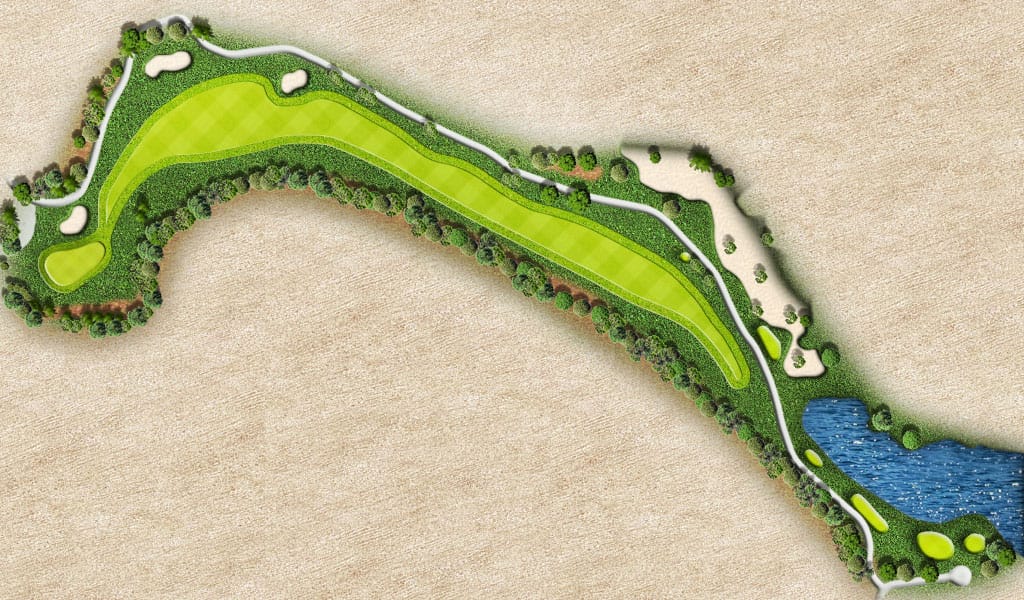
Par 5 | Bougainvillea
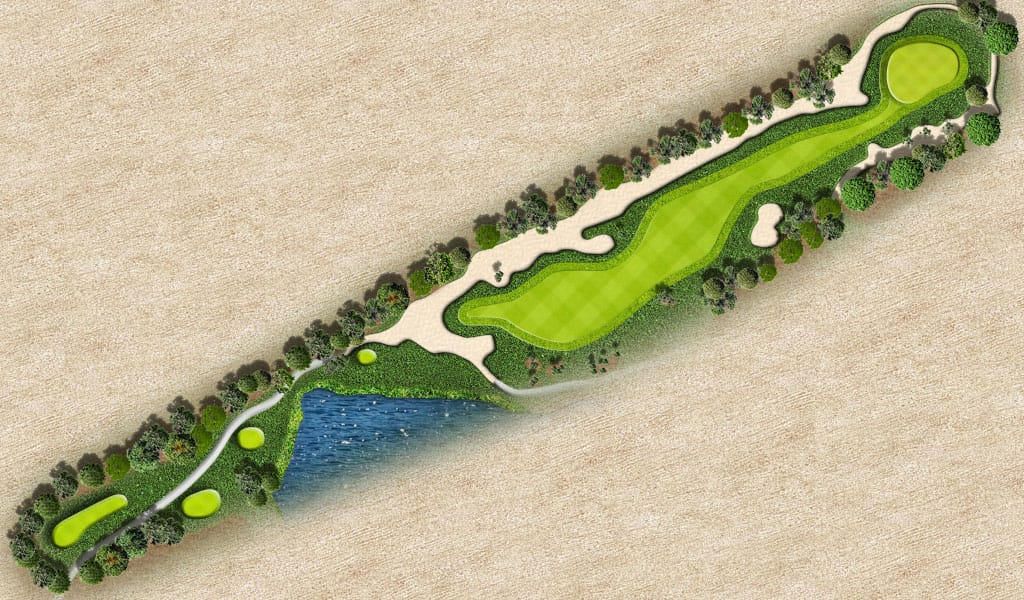
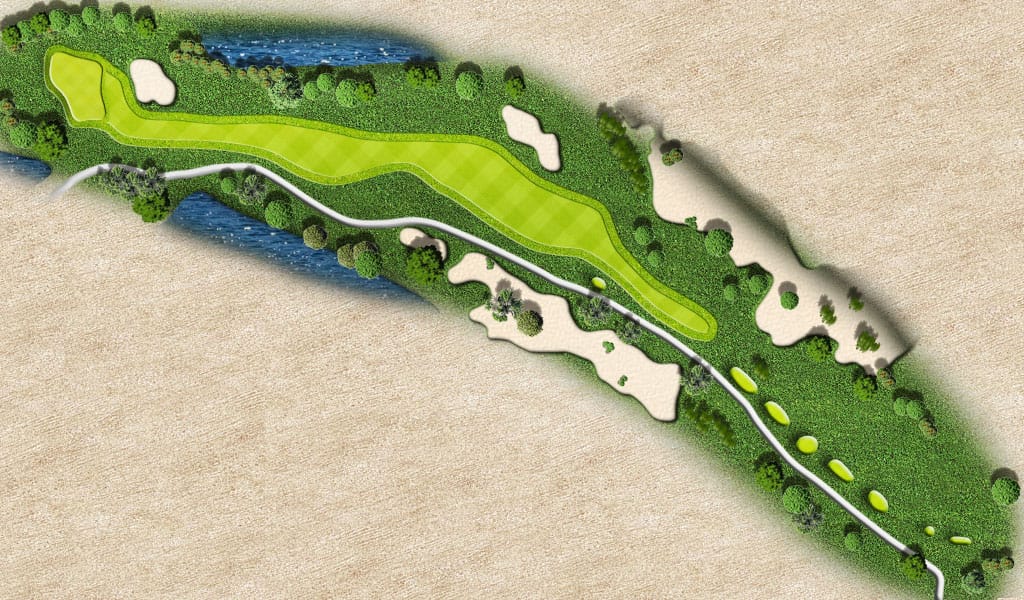
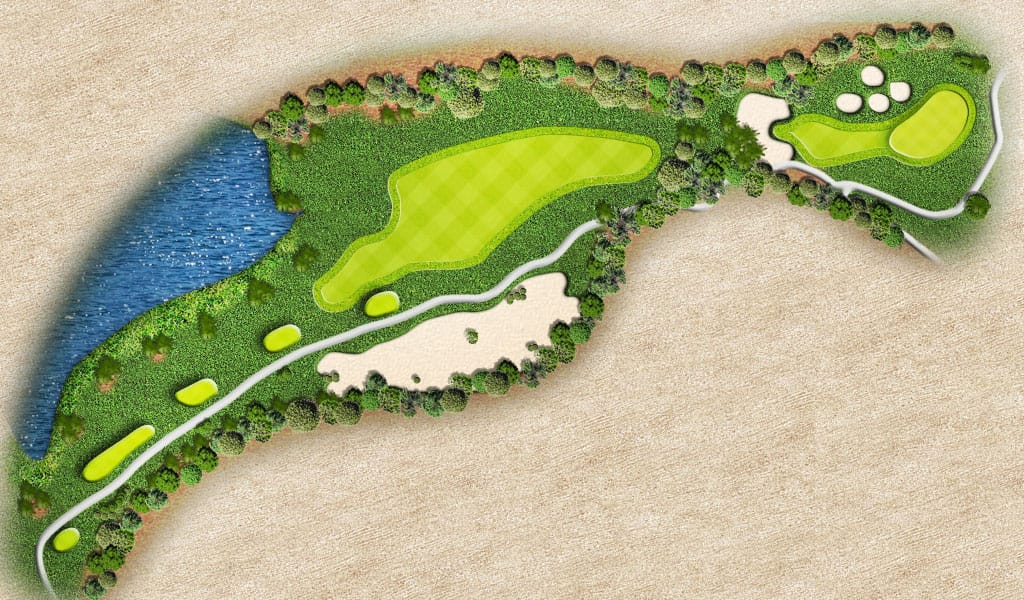
A par 5 hole with a small landing zone due to the large oak tree that you see from the tee box. The best play is to stay left of the tree and away from the water. This will leave you with a good angle for your long approach shot. When setting yourself up for an approach, you must stay away from the right side to avoid the water. Receptive green and the play is middle of the green to avoid a long putt.
Tee & Yards I: 525II: 514III: 492IV: 468V: 436VI: 436VII: 327
Handicap: Men: 10, Ladies: 2
-
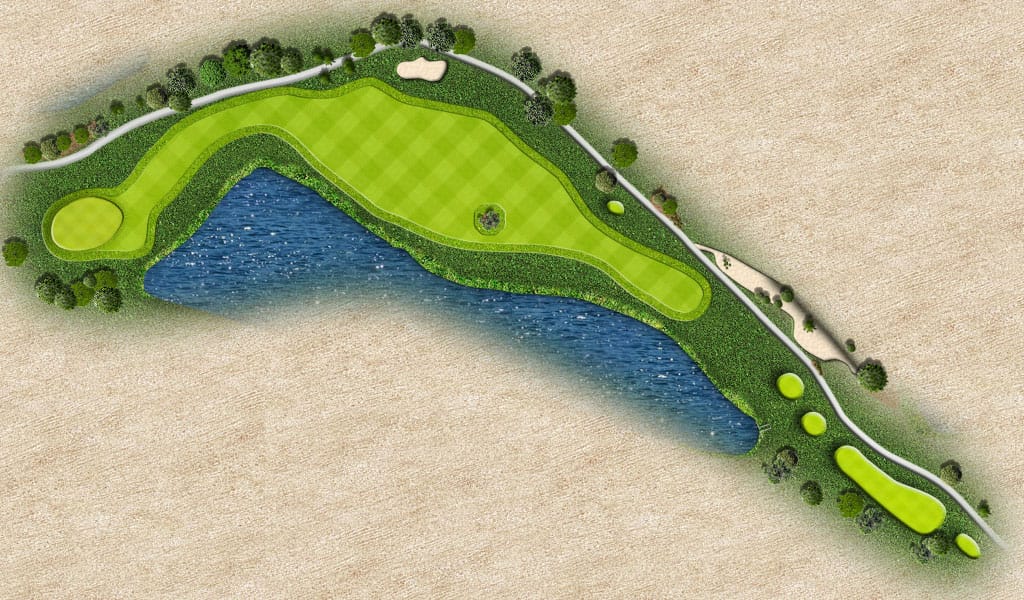
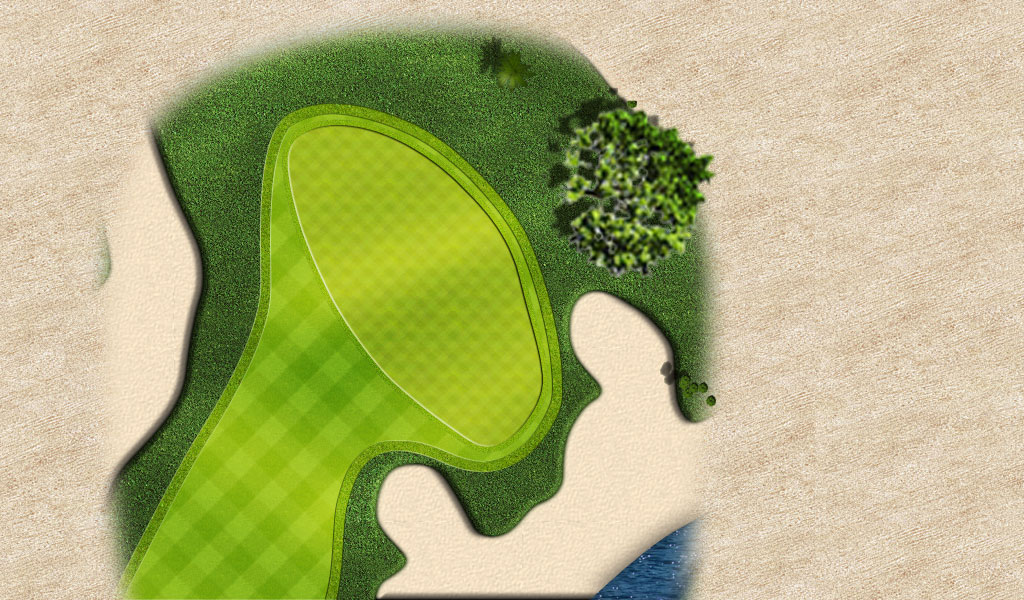
Hole #3
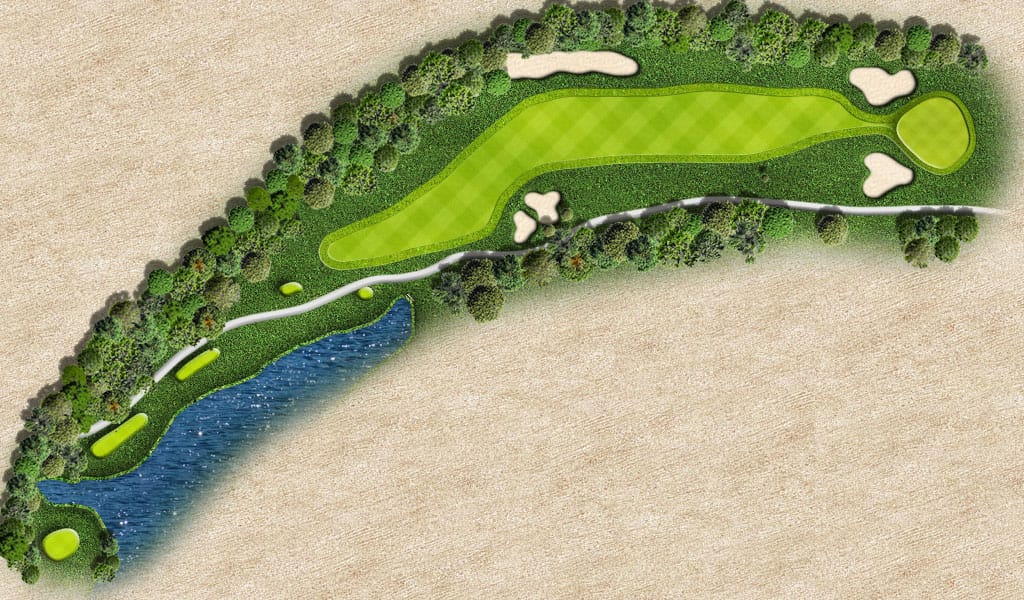
Par 4 | Live Oak
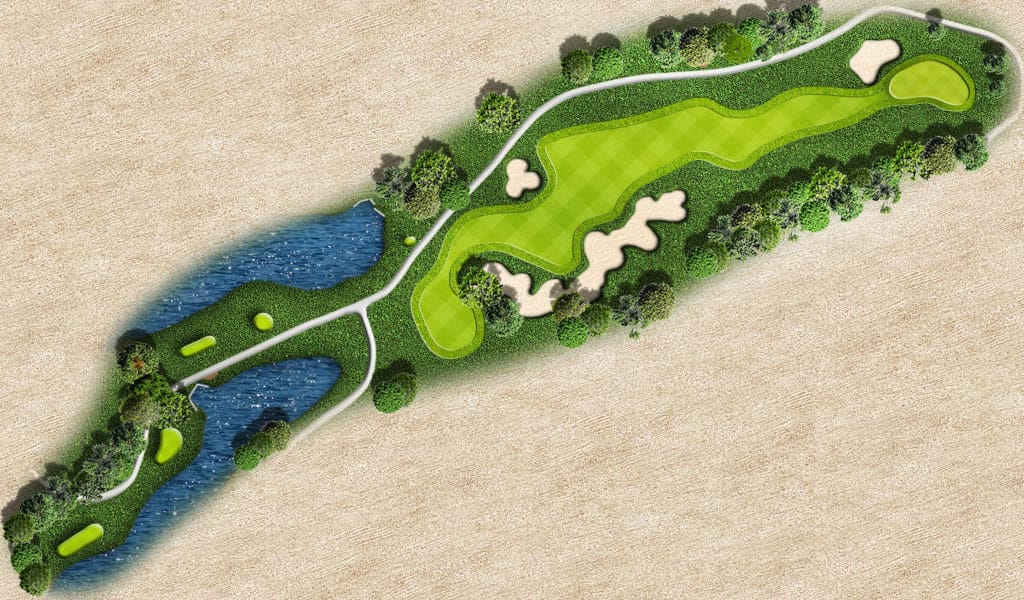
A tough dogleg par 4. Drives should be right center to avoid the large “live oak” positioned at the left side of the fairway. This will allow a nice approach shot to a large green. Safe play is middle of the green as the back of the green can be quite treacherous.
Tee & Yards I: 410II: 381III: 367IV: 354V: 335VI: 320VII: 221
Handicap: Men: 2, Ladies: 6
-
Hole #4
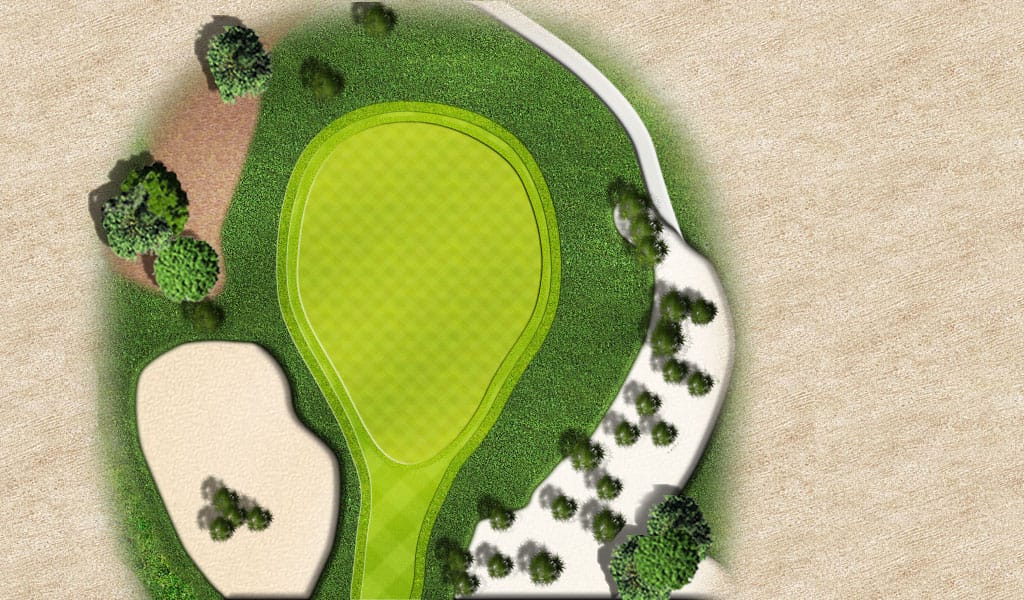
Par 3 | Bald Cypress
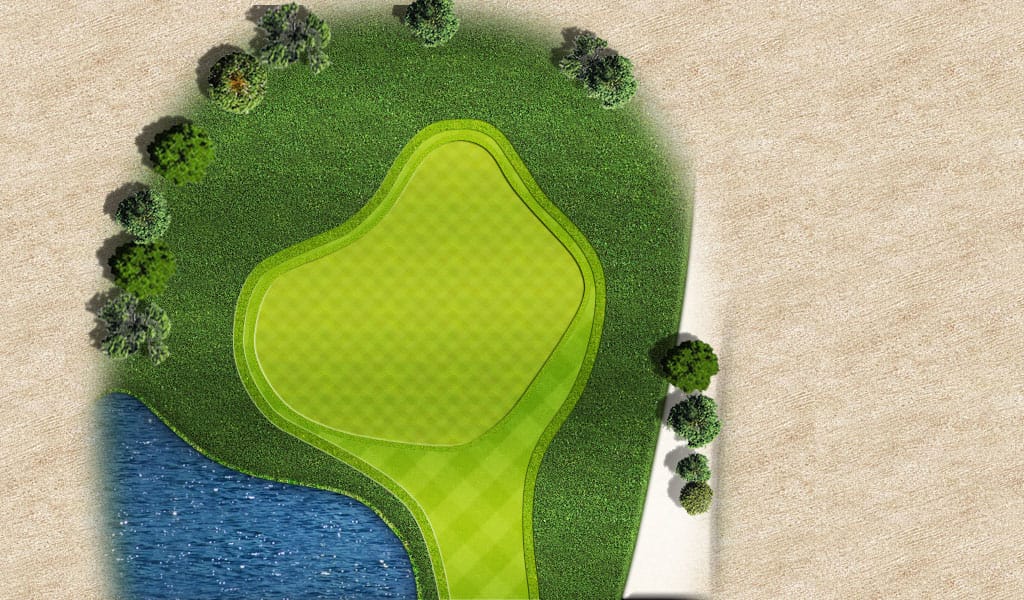
Par 3 hole with lots of water and a large bunker to hit over. Playing this hole is all about hitting a solid shot to the middle of the green. Being a bit long is not a bad play!
Tee & Yards I: 158II: 158III: 150IV: 142V: 135VI: 126VII: 107
Handicap:Men: 16, Ladies: 16
-
Hole #5
Par 4 | Laurel Oak
A straight away par 4 with a tough green. Approach this hole from the left side of the fairway. Hit for the front of this green for a nice birdie or par!
Tee & Yards I: 427II: 393III: 372IV: 350V: 330VI: 310VII: 223
Handicap:Men: 8, Ladies: 14
-
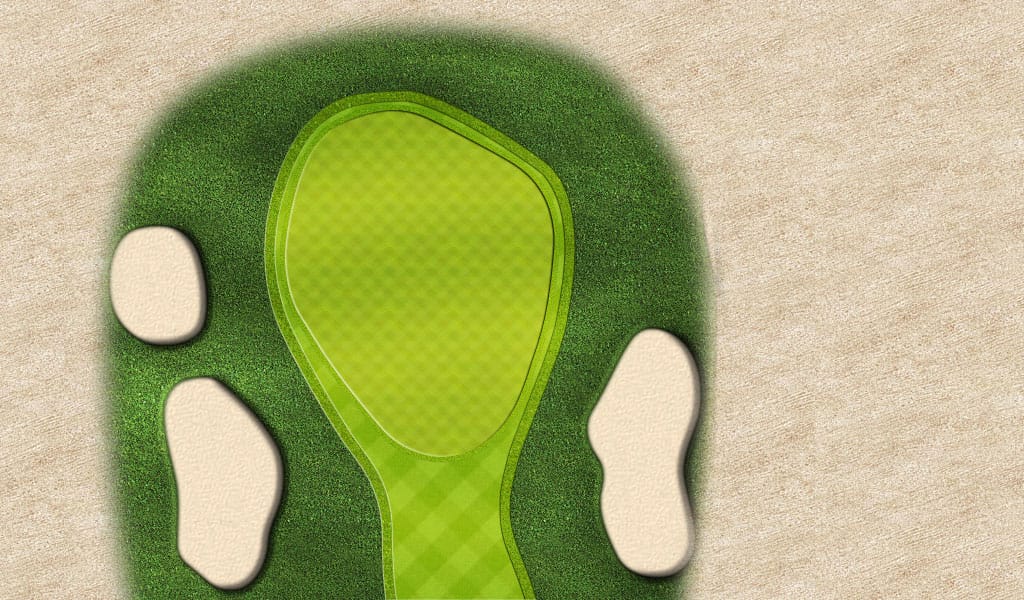
Hole #6
Par 3 | Magnolia
A straightaway par 3 with a large green. This green is surrounded by a deep bunker. The play is a high shot for a great chance at a par!
Tee & Yards I: 198II: 185III: 169IV: 158V: 141VI: 128VII: 99
Handicap:Men: 18, Ladies: 18
-
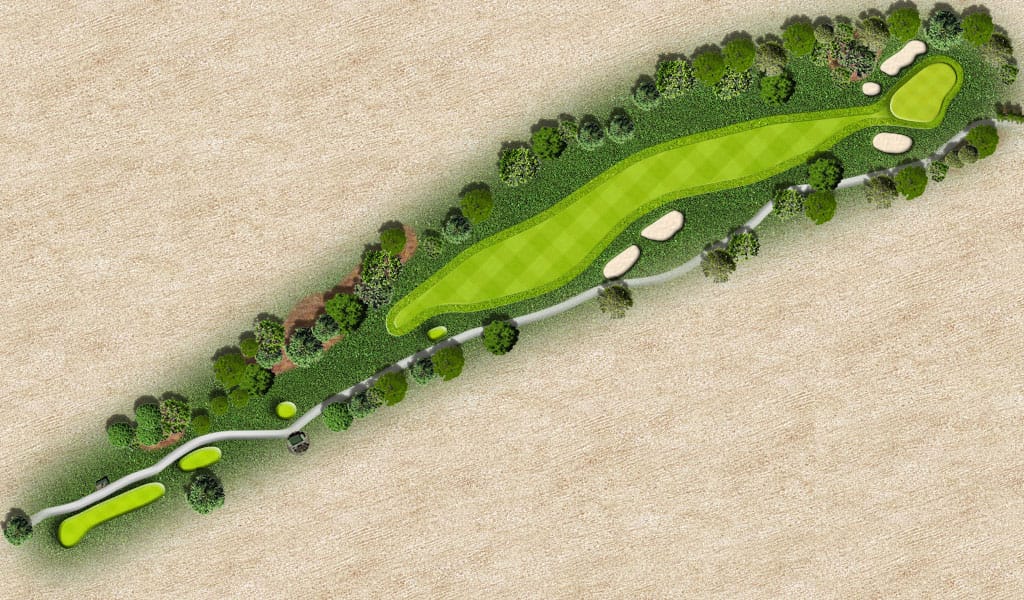
Hole #7
Par 4 | Cactus
An uphill par 4 with fairway bunkers guarding the right side. A good drive to the middle will set up a shot into a well-guarded green. Picking the correct approach shot is very important on this hole.
Tee & Yards I: 377II: 365III: 353IV: 327V: 319VI: 282VII: 214
Handicap:Men: 4, Ladies: 10
-
Hole #8
Par 4 | Canna Lily
A short par 4 with a narrow fairway. Length is not the trouble here, getting in the fairway is crucial. The green is not large, so a short iron shot wit accuracy is important.
Tee & Yards I: 346II: 338III: 330IV: 299V: 274VI: 274VII: 224
Handicap:Men: 6, Ladies: 8
-
Hole #9
Par 5 | Bottle Brush
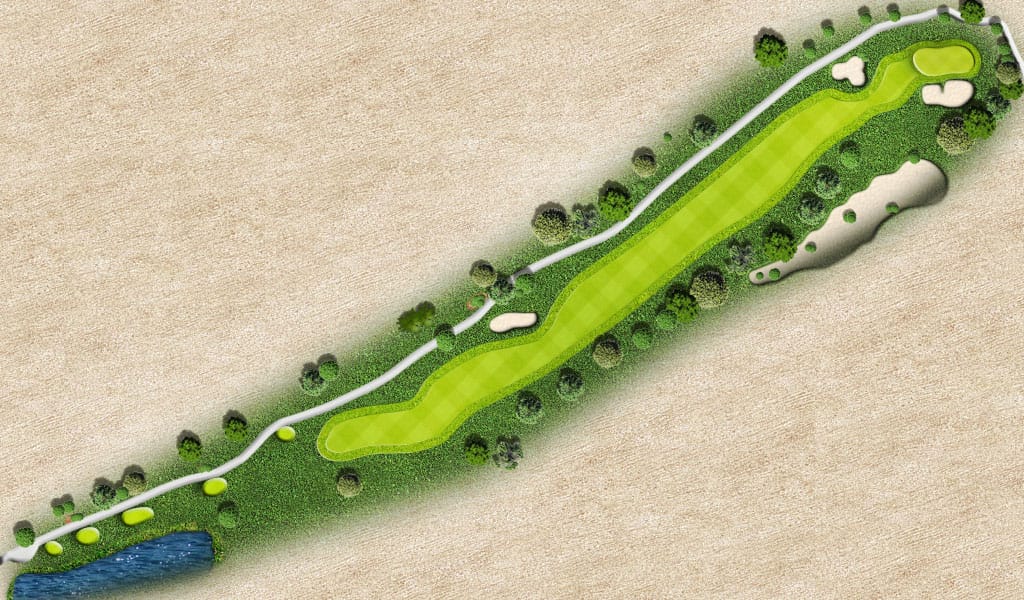
Long uphill par 5 with a wide fairway. The approach shot is the important part of this hole because of a large bunker in front of the green. Very narrow green, but with the proper club, you can walk away with a nice birdie or par.
Tee & Yards I: 502II: 496III: 485IV: 449V: 449VI: 435VII: 318
Handicap:Men: 14, Ladies: 4
-
Hole #10
Par 5 | Sycamore
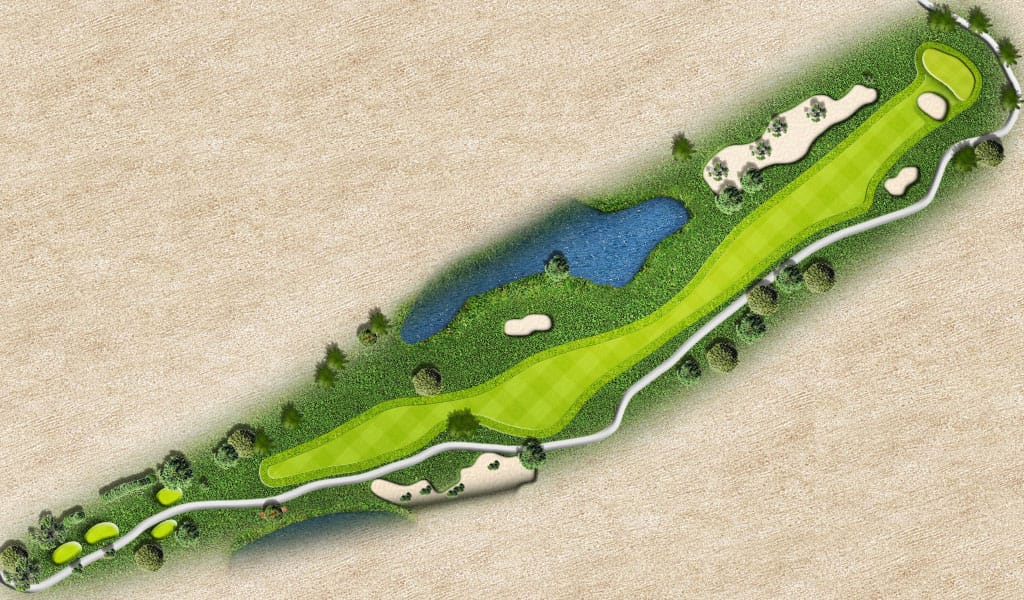
Long uphill par 5 with a wide fairway. The green is well guarded with bunkers. Playing down the lefthand side of the fairway on your second and third shots, will set you up for a nice approach shot to a large green.
Tee & Yards I: 536II: 517III: 490IV: 447V: 447VI: 402VII: 341
Handicap:Men: 9, Ladies: 9
-
Hole #11
Par 4 | Norfolk Pine
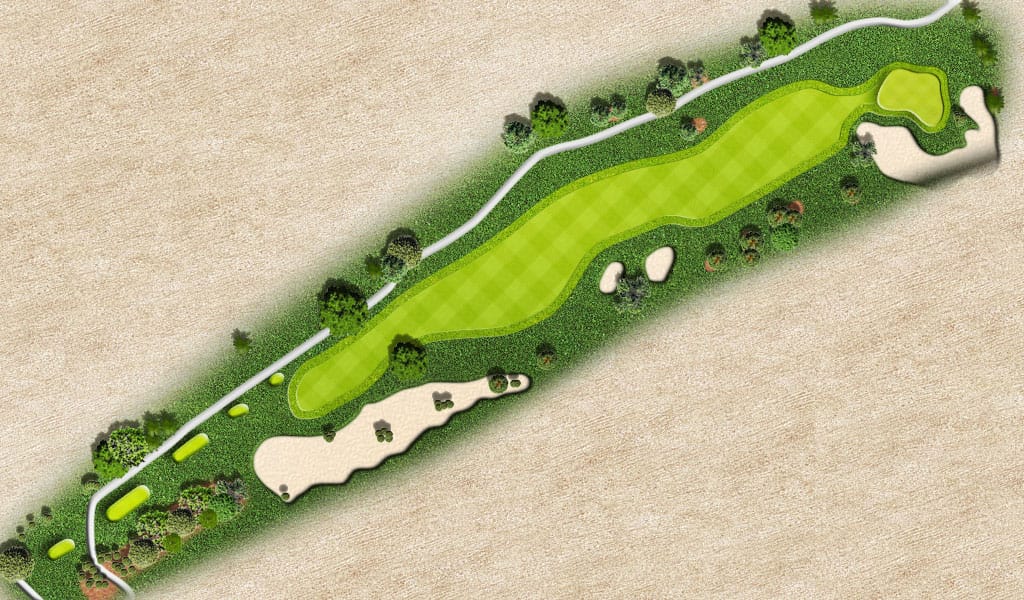
Long uphill par 4 with a difficult approach shot. This green is well guarded with a large bunker, but is also very small and narrow. Playing down the left side for a good chip onto the green is your play if you cannot hit the high soft shot.
Tee & Yards I: 390II: 350III: 350IV: 330V: 320VI: 298VII: 280
Handicap:Men: 7, Ladies: 11
-
Hole #12
Par 4 | Silver Tab
A par 4 with a risk/reward approach to a narrow green. To play this hole well, a good drive in the middle of the fairway, staying away from the bunkers on the right side and the tree line and out-of-bounds on your left. The approach to this green is tricky, as there is a very large bunker in front and having the green be narrow, you must approach with a high soft shot. If going for the green isn’t an option, playing down the lefthand side following the fairway will give you a nice chipping area for your approach.
Tee & Yards I: 424II: 390III: 368IV: 350V: 332VI: 313VII: 238
Handicap:Men: 1, Ladies: 1
-
Hole #13
Par 3 | Sable Palm
Short par 3 with a well-guarded green. High, soft shot is necessary for this par 3.
Tee & Yards I: 172II: 172III: 152IV: 140V: 112VI: 112VII: 87
Handicap:Men: 15, Ladies: 13
-
Hole #14
Par 4 | Slash Pine
Short dogleg right par 4. Key with the drive is left of the two bunkers on the corner. Once your drive is in the middle, it’s a straight shot to the green.
Tee & Yards I: 372II: 363III: 334IV: 320V: 289VI: 226VII: 220
Handicap:Men: 11, Ladies: 17
-
Hole #15
Par 5 | Whispering Pine
Long par 5 with sharp dogleg left to the green. Good 3 shot hole straight down the narrow fairway. Lots of risk reward on this hole, but be careful of the tall pines. Elevated green is a difficult green to hold, so play is to the front of green.
Tee & Yards I: 548II: 534III: 501IV: 454V: 401VI: 401VII: 350
Handicap:Men: 3, Ladies: 5
-
Hole #16
Par 4 | Palmetto
Par 4 with our only forced carry on the golf course. Layup off the drive to set yourself up for the carry over the palmetto hazard. The green is well guarded with bunkers on the left, but a straight shot to an elevated green makes for a good play.
Tee & Yards I: 401II: 365III: 355IV: 321V: 278VI: 239VII: 242
Handicap:Men: 5, Ladies: 3
-
Hole #17
Par 3 | Spanish Moss
Par 3 with lots of water. Choosing the correct club here is important!
Tee & Yards I: 173II: 153III: 143IV: 132V: 120VI: 107VII: 107
Handicap:Men: 17, Ladies: 15
-
Hole #18
Par 4 | Queen Palm
Uphill par 4 with many obstacles in your way off the tee. Long drive down the lefthand side is the play. Most approach shots will be blind, so make your aim be correct with your approach. Long green makes for the correct club choice.
Tee & Yards I: 415II: 365III: 356IV: 328V: 301VI: 289VII: 189
Handicap:Men: 13, Ladies: 7